smartCARS 3
A complete guide to the operation of smartCARS 3 at Canada Air Virtual.
- What is smartCARS 3?
- Overview of features
- Differences between smartCARS 3 and VaBase Acars
- Compatibility and system requirements
- Glossary of Terms & Terminology
- Installation
- Logging In
- Unverified Plugins
- What is this TFDi Design Login about?
- Connecting to Canada Air Virtual
- Logging into your account
- Understanding the dashboard
- Configuring settings & plugins
- Setting Up a Flight
- Dispatching a Schedule
- Dispatching a Tour Leg
- Dispatching an Event
- Dispatching a Charter Flight
- Importing flight details from SimBrief
- Dispatching a flight from our website
- Starting a Flight
- During the Flight
- Ending a Flight
- Reviewing Your Flights
- Integration with Third-Party Tools
What is smartCARS 3?
smartCARS is a flight tracking and management system for Microsoft Flight Simulator X, Prepar3D, X-Plane, and Microsoft Flight Simulator. A flight tracking system (known as an ACARS) to help pilots plan, track, and report flights to either their own logbooks or their virtual flying community.
Many tools exist for this purpose, but smartCARS packs in a host of additional features to make online flight simulation more fun and more reliable. It is used by hundreds of virtual airlines, loved by thousands of pilots, and is the most advanced flight tracking system available for desktop flight simulators.
Overview of features
- Incredibly detailed flight tracking
- Plan flights on SimBrief without leaving smartCARS
- View and review past PIREPS
- Integrated map showing online Canada Air traffic
- Create a one-of-a-kind experience by installing (or creating) plugins
- Listen to music and live entertainment via integrated Sky Blue Radio players
- Integrates with industry leading software1
- All major desktop operating systems and simulators are supported
1 Including our custom-built VA management system, which means we have much greater control over how we handle pireps and flight dispatches.
Differences between smartCARS 3 and VaBase Acars
smartCARS 3 and our previous Acars application from VaBase are similar, but there are some significant difference that we'd like to point out here:
smartCARS 3 has these additional features:
- full searchable access to all of our schedules directly inside the application
- ability to bid on/dispatch multiple flights
- a logbook that displays your entire flight history with Canada Air Virtual
- integrated flight planning with Simbrief
- import of a Simbrief generated flight
- viewing of a Simbrief OFP inside the application
- proper handling of simulator pause state
- automatic pirep submission on engine shutdown (optional), so you no longer have to worry about forgetting to submit your pirep
- instant approval of pirep if all parameters of flight are within acceptable values
smartCARS 3 does not have these features that you may have been used to:
- no performance metrics
- this means there no longer is a performance score awarded after the flight
Note that smartCARS 3 is under active development, and we expect new features to be added over time as TFDi Design continue to improve the application.
Canada Air Virtual is not able to make any changes inside smartCARS 3 itself. We can only control what we do with the data that is sent to and received from smartCARS 3.
Compatibility and system requirements
- Windows 10 or later, x86_64 Linux, MacOS 12 or later
- 1GB or more of RAM
- 250MB of hard drive space
- Ensure the tracking provider is set properly in the Settings


Glossary of Terms & Terminology
This is a small glossary of terms as they are used in smartCARS 3 in relation to our website or other common verbiage we use.
- Charter - a charter flight is an ad-hoc flight that a pilot is creating. The pilot may choose any departure, arrival, airplane, and other variables to build a custom flight which then becomes a Dispatch to be flown.
- Dispatch - also called Bid in smartCARS 3 - is the record of a flight that a pilot is intending to fly. This is what shows in the My Dispatches page on the website or in the Flight Center screen in smartCARS 3. Dispatches or Bids are turned into Live Flights when smartCARS 3 is tracking them. A Dispatch is created by dispatching a scheduled flight, a tour leg, an event, or a charter flight.
- Live Flight - this is a flight that is being actively tracked by smartCARS 3. It is visible to others, either on the Live Flights screen in smartCARS 3 or in the various Live Flights sections on our website.
Installation
Downloading smartCARS 3
Download smartCARS 3 for your operating system from https://smartcars.tfdidesign.com/central/download
Below is a video with step-by-step instructions on how to install and configure smartCARS 3.
System requirements
See https://kb.canadaairvirtual.ca/books/smartcars-3/page/compatibility-and-system-requirements
Troubleshooting common installation issues
We will note here any common installation issues along with resolutions where possible.
Please keep in mind that smartCARS 3 is not a Canada Air Virtual application, so all support requests should be pointed at TFDi Design's support system.
I'm told not to run smartCARS 3 as administrator, but I am not.
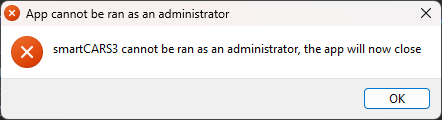
This can happen if you have UAC disabled on your PC. It will make smartCARS 3 incorrectly assume you're running it as an administrator. You should re-enable it.
Where is smartCARS 3 installed?
%LOCALAPPDATA%\TFDi Design\smartCARS
I only get a white screen when launching smartCARS 3
Try these steps to resolve:
- Uninstall smartCARS 3
- Navigate to %LOCALAPPDATA%\TFDi Design and delete its contents
- Reinstall smartCARS 3
Logging In
Unverified Plugins
When launching smartCARS 3, you may see a popup message asking you to confirm the installation or update of Unverified Plugins.
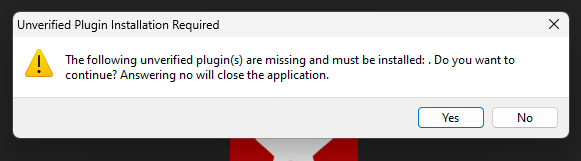
This is expected and nothing to worry about! Simply click Yes to proceed.
Canada Air has developed several custom plugins, the Flight Center and the Live Flights plugin. Anytime there is an update to those, you may see this message.
Note, there is currently a bug with smartCARS 3 where you will receive this message on every launch. Simply click Yes.
What is this TFDi Design Login about?
The very first screen that you see upon launching smartCARS 3 is a login screen for a TFDi Design account.
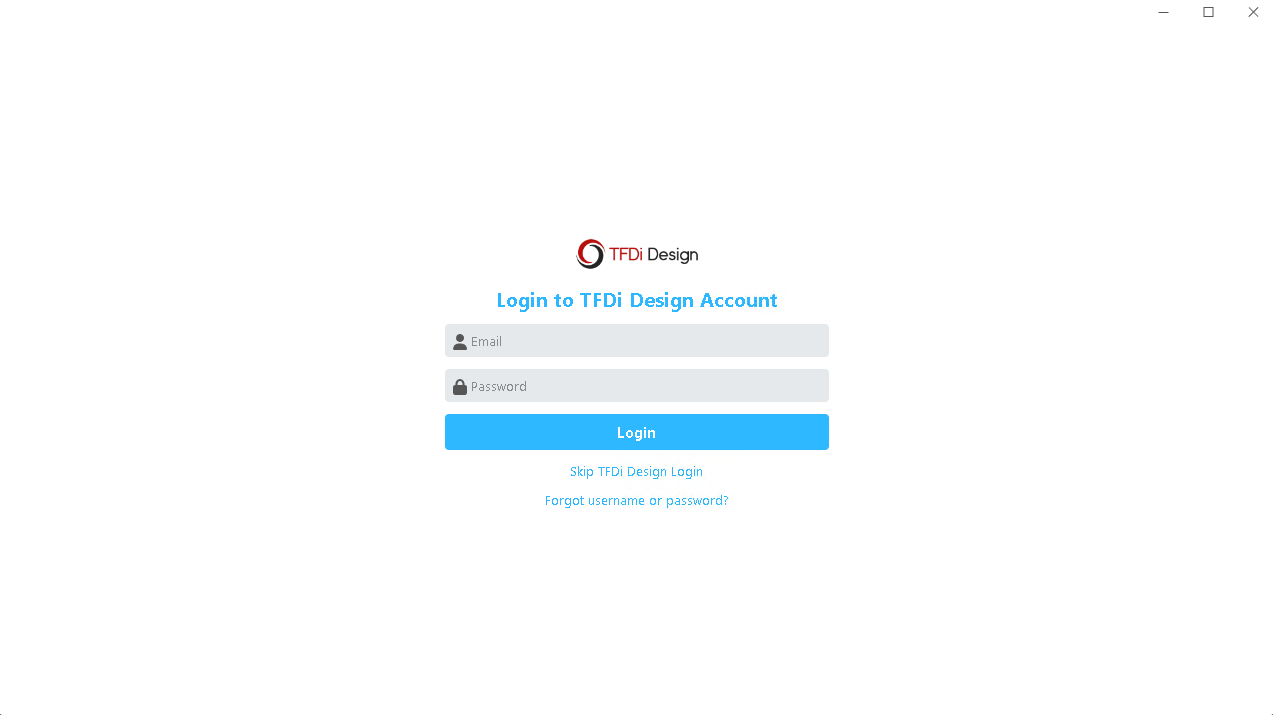
This is entirely optional and not required for your Canada Air Virtual flights!
Here are some potential benefits to creating a TFDi Design account:
- It's the only way to not be asked to log into a TFDi Design account on each launch of smartCARS 3
- Your flight will appear on the integrated map
- You then have the option to upgrade to a smartCARS 3 Pro account. More details at https://tfdidesign.com/smartCARS3.php
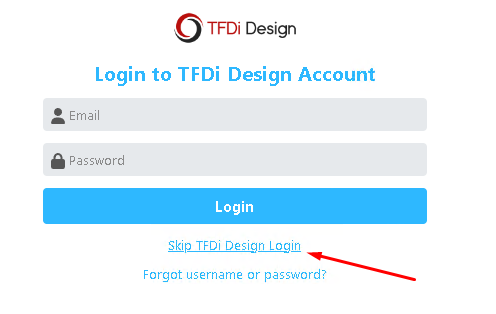
If you don't have a TFDi Design account, click Skip TFDi Design Login.
Connecting to Canada Air Virtual
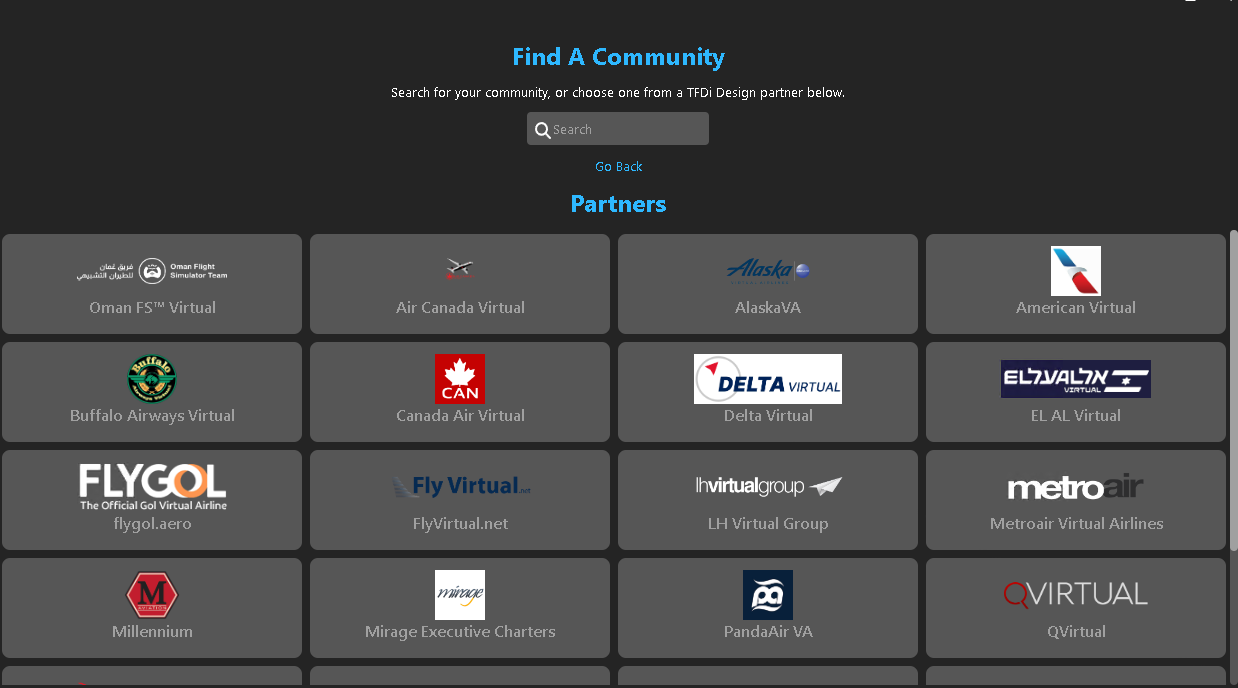
The first time you connect, you will be asked if you want to fly "On my Own" or "With a Community". Choose "With a (another) Community".

Simply click on the Canada Air Virtual logo in the list of airlines, or use the search box to search for "Canada Air" and select it.
You'll then be presented with the login screen.
Be careful not to accidentally select Air Canada Virtual!
Logging into your account
Provide your credentials in the form of your email address or callsign (i.e. CAN1001) and password. This is the same password that you use to log in at https://va.canadaairvirtual.ca.
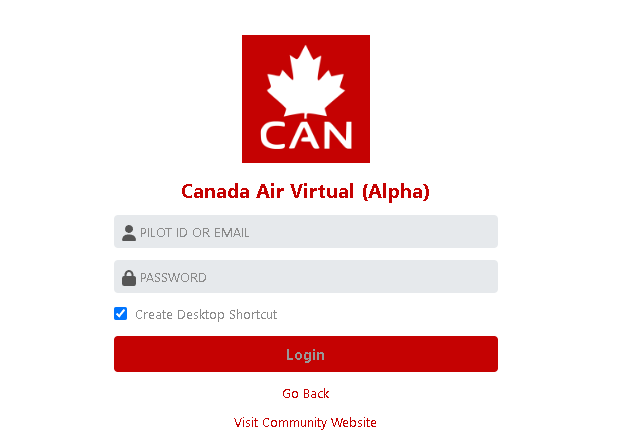
We suggest you leave the "Create Desktop Shortcut" checkbox checked. This will create a nice looking shortcut for "Canada Air Virtual" on your desktop.

Understanding the dashboard
Once logged in, this is what your dashboard in smartCARS 3 looks like.
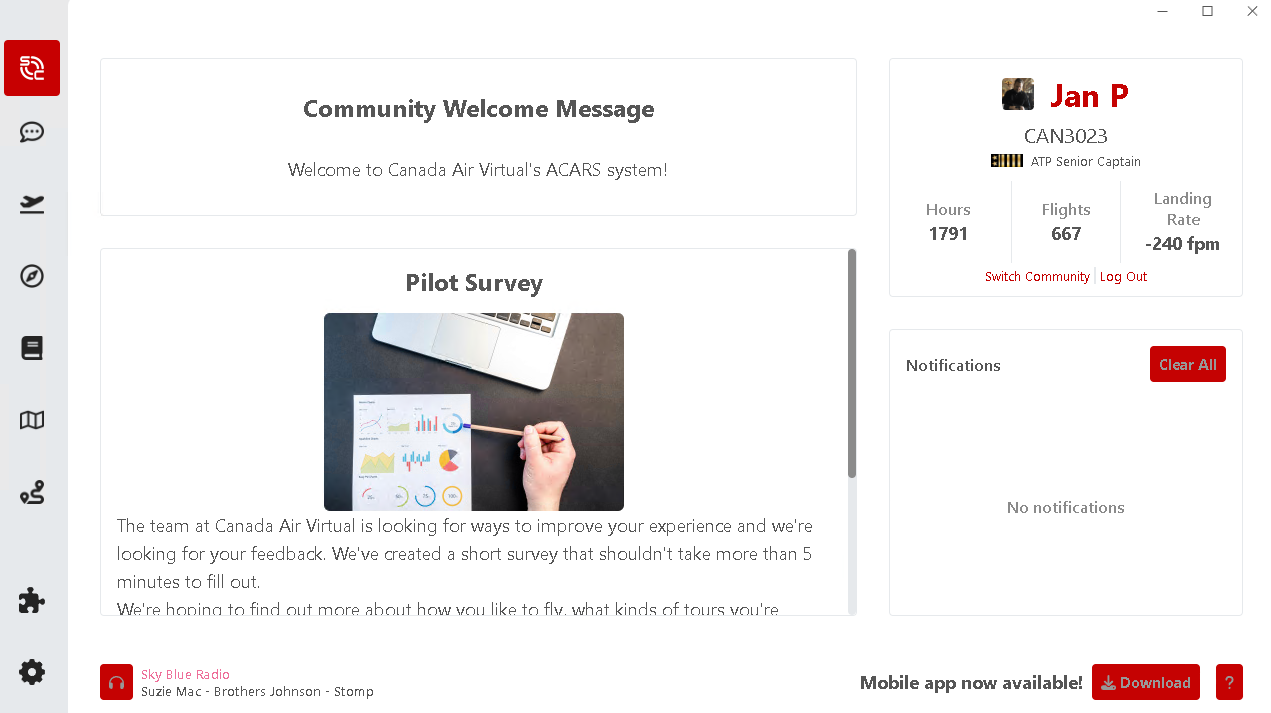
Note: you may not have one of the icons on the right side until you install the Simbrief plugin, should you so desire.
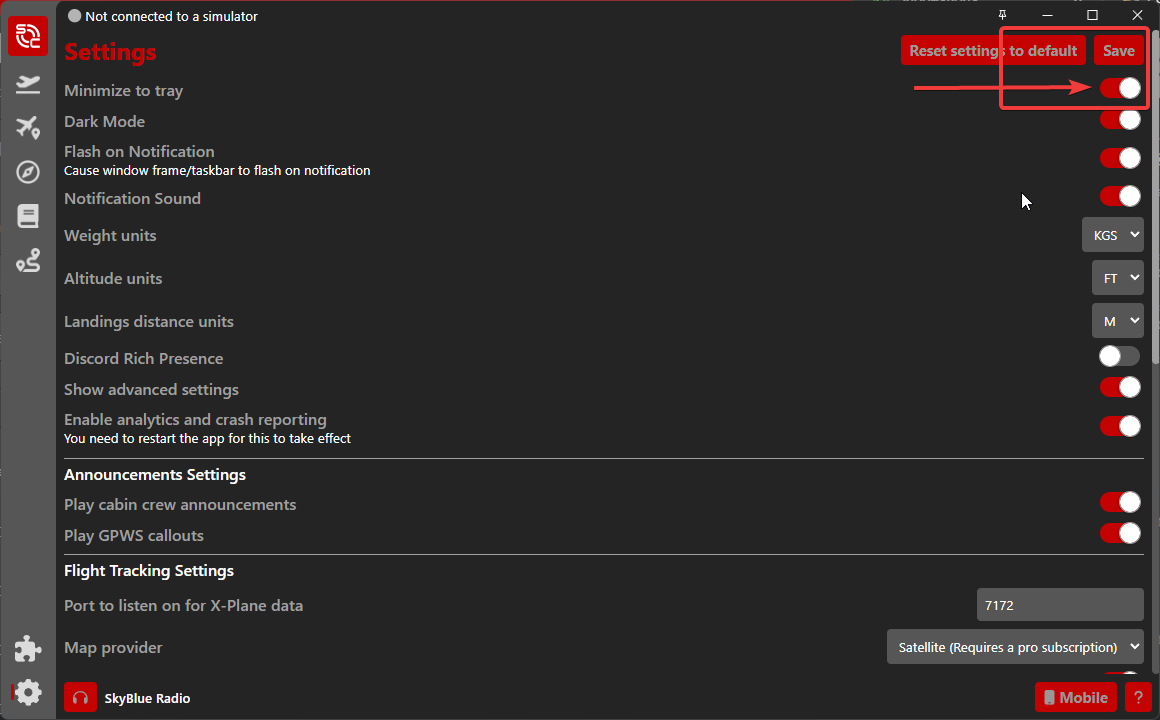
Configuring settings & plugins
The icon in the bottom left of the sidebar is the Settings icon:

This is where you can configure various functions of smartCARS 3 to your liking.
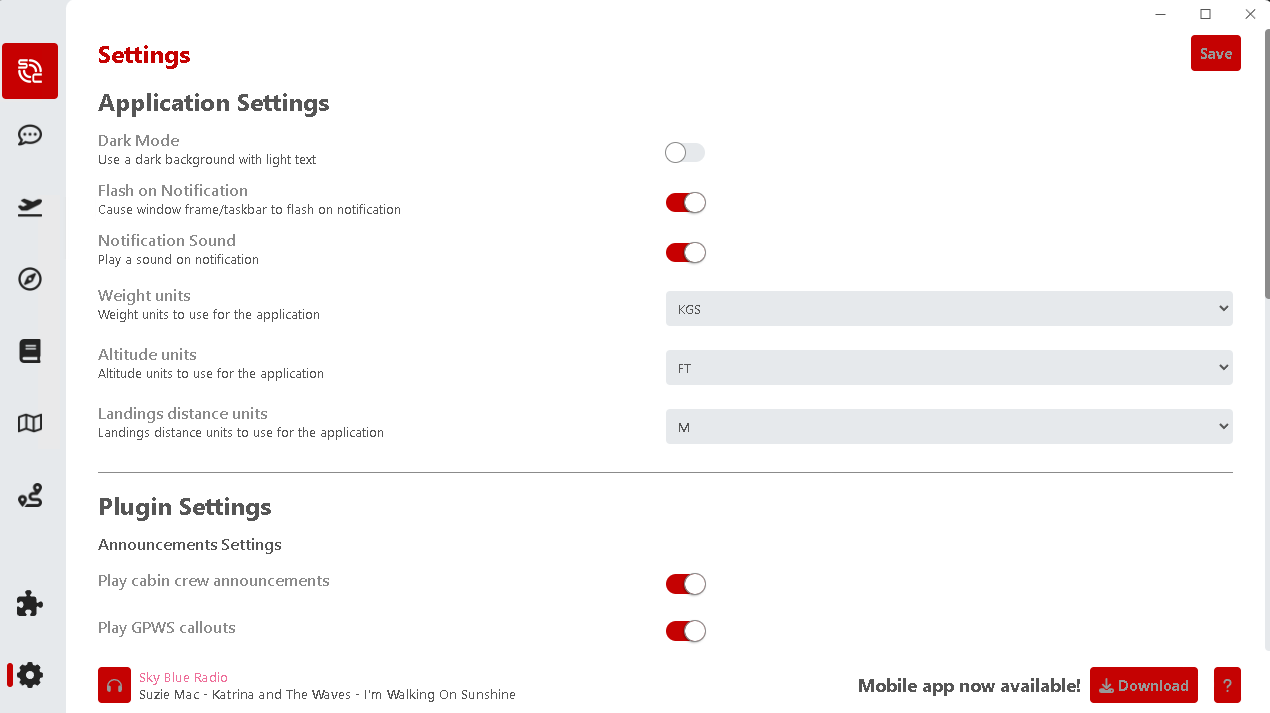
Some settings worth noting are:
- Dark Mode
- Flight Tracking Settings
- Automatic PIREP submission (recommended ON)
- SimBrief Settings (if plugin enabled)
Be sure to click the Save button in the top right to save your settings!
Setting Up a Flight
There are two main ways to set up a flight:
- Inside of smartCARS 3's Flight Center. This can be used for:
- Scheduled flights
- Tour legs
- Events
- Charter flights
- Importing from SimBrief (if plugin is installed)
- From our website. This can be used for:
- Tour legs
- Events
Dispatching a Schedule
Access the Flight Center via the icon in the left sidebar.
You will be presented with the My Dispatched Flights screen, which will show any dispatched flights that are ready to be flown.
Dispatch a Scheduled Flight
To dispatch a new flight from our vast list of schedules, click the Dispatch Schedule button.

Search for a Flight
This screen lets you search through all of our schedules.
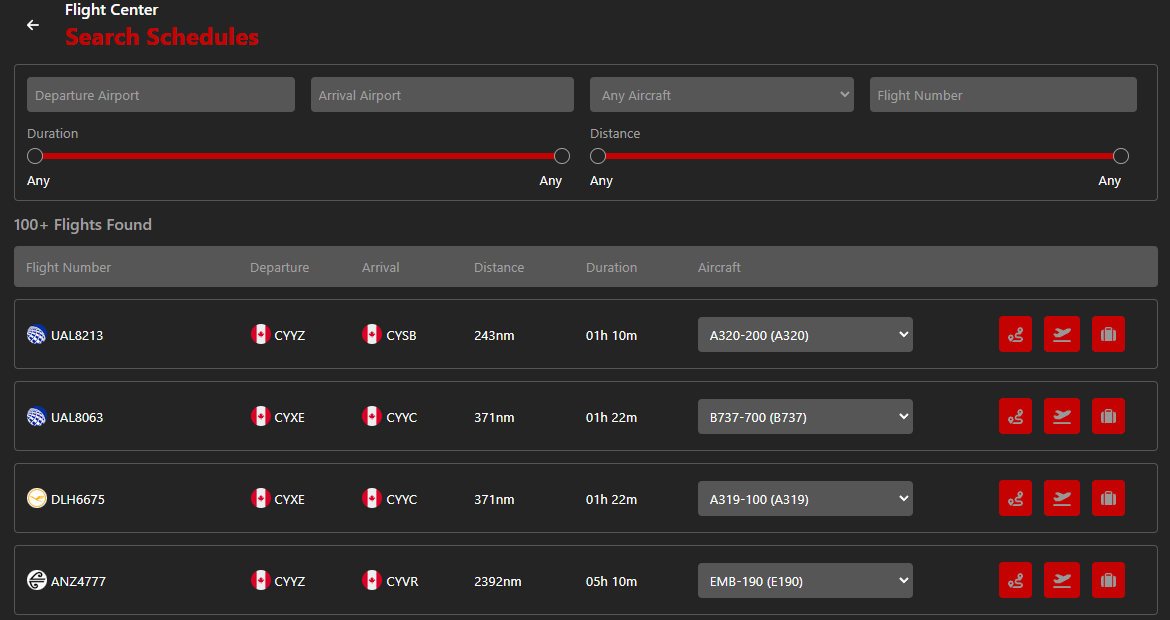
The results will always be limited to a maximum of 100 flights.
The following search criteria are available to help customize your results:
- Departure Airport
- queries from our list of over 80,000 airports based on data from OpenAIP and OurAirports
- Arrival Airport
- queries from our list of over 80,000 airports based on data from OpenAIP and OurAirports
- Aircraft
- queries from a list of SimBrief supported aircraft
- Flight Number
- search for any real-world flight number
- Duration
- use the slider to set a minimum and/or maximum duration in hours
- Distance
- use the slider to set a minimum and/or maximum distance in nautical miles
At any time, you can click inside the row of any result to see more details about a flight.
Selecting a Scheduled Flight

Note: the screenshot is out of date. There is only the dispatch button, the luggage icon.
Once you've found a desired flight, you can click "Bid on this flight" to add the flight to your Flight Center's list of dispatched flights. Note that you should choose a desired aircraft from the list if it is not already populated. You're welcome to change the preselected aircraft as well.
Dispatching a Tour Leg
This works similarly to dispatching a schedule, but you click the Dispatch Tour button.

You're then presented with all the tour legs available for you to dispatch.
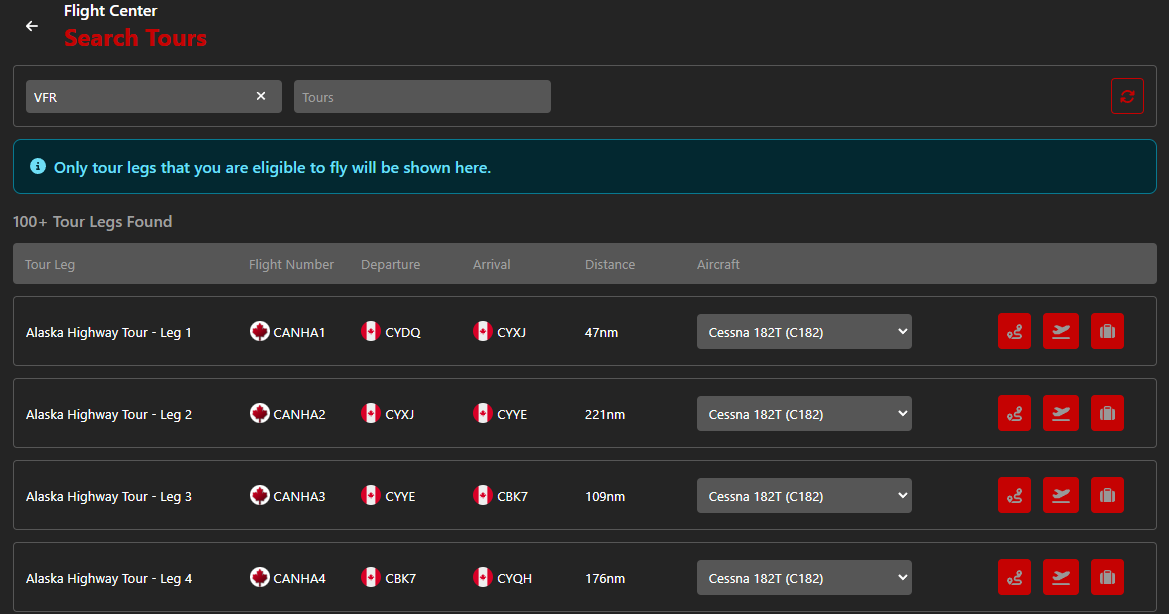
In order for a tour leg to appear here, it must meet one of the following conditions:
- Be the first leg in a tour
- Be any leg of a tour where the Legs Flown in Order is not a requirement
- Be the next leg of a tour where you've flown all previous legs
- Be any leg you've already flow (this will be signified by a checkmark icon)


Dispatching an Event
To dispatch an event, visit the Flight Center and click Dispatch Event.

Here you will see all events that are upcoming.
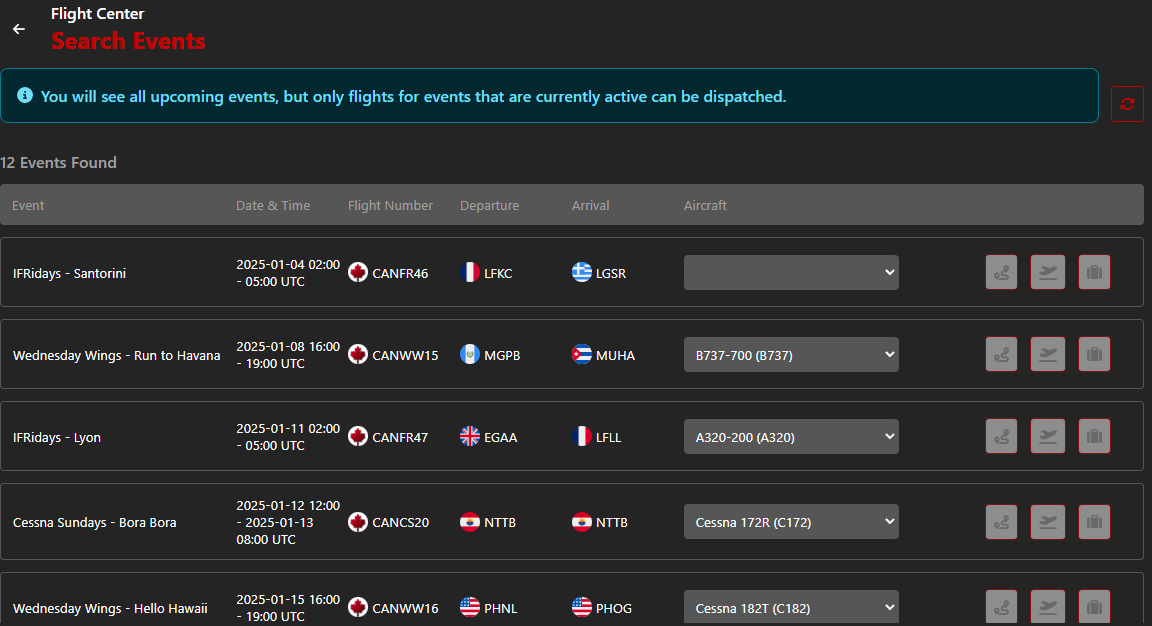
Note that only events that are currently active (current time is after the start date and before the end date) will have the dispatch buttons enabled.
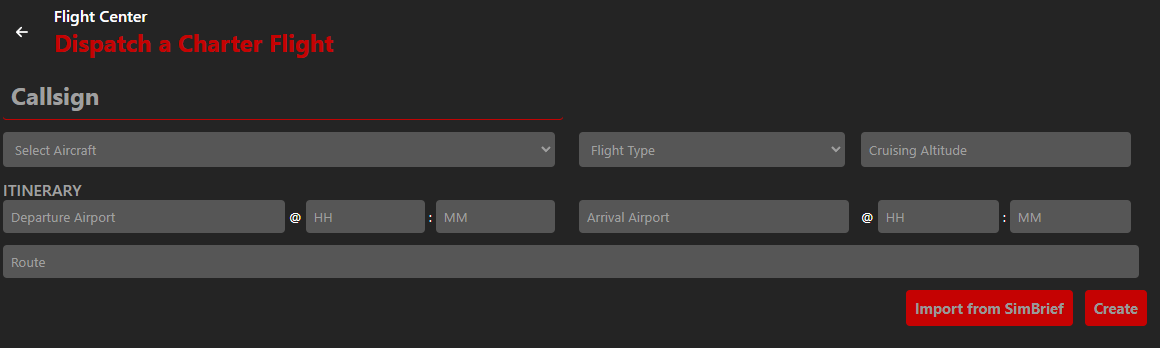
Dispatching a Charter Flight
Access the Flight Center via the icon in the left sidebar.
You will be presented with the My Flights screen, which will show any dispatched flights that are ready to be flown.
Create a Charter Flight
A Charter Flight is merely a flight that you create on your own, based on whatever flight criteria you desire.
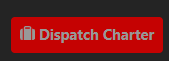
To create a new Charter Flight, click the Dispatch Charter button.
Provide Charter Flight Details
On the "Charter a Flight" screen, populate the details required to create the flight. All fields except for the route are required.

Here is an explanation of each field:
- Callsign
- This may be a real-world flight number, such as ACA80, or your pilot callsign, such as CAN1001.
If in doubt, use your pilot callsign.
- Aircraft
- Choose the aircraft you plan to fly based on the list of SimBrief supported airframes. If the plane you intend to fly is not in the list, choose the next closest match.
- Flight Type
- Choose between Passenger and Cargo
- Cruising Altitude
- Specify the altitude you plan to fly at. SmartCARS 3 will use that to determine when you've reached the cruise stage.
- Departure Airport
- Select from our list of over 80,000 airports based on data from OpenAIP and OurAirports
- HH
- Provide the estimated departure time in 24 hour format
- MM
- This is the estimated departure minutes
- Arrival Airport
- Select from our list of over 80,000 airports based on data from OpenAIP and OurAirports
- HH
- Provide the estimated arrival time in 24 hour format
- MM
- This is the estimated arrival minutes
- Route
- This is an optional description of the route
If you have the SimBrief plugin installed, you may click the Import from SimBrief button to import all the required data.
Click the Create button to create the Charter Flight.
Importing flight details from SimBrief
Access the Flight Center via the icon in the left sidebar.
You will be presented with the My Dispatched Flights screen, which will show any dispatched flights that are ready to be flown.
Import from SimBrief
To import flight details from SimBrief, click the Dispatch Charter button.

If you have the SimBrief plugin installed, you may click the Import from SimBrief button to import all the required data.
Click the Create button to create the flight.
Dispatching a flight from our website
Flights can also be dispatched from our website. This applies to schedules, events, and tour legs.
Visit the Scheduled Flight, Tour Leg or Event in question and look for the Dispatch button.

or

Once clicked, the Scheduled Flight, Tour Leg, or Event flight will appear in the Flight Center in smartCARS 3 as well as the My Dispatched Flights page.
Note that some tour legs are required to be flown in order and may not be dispatched if the previous leg has not been completed. Similarly, Event flights can only be dispatched after the event's start time and before its end time.
You can also dispatch a Charter Flight via the website by using the Dispatch Charter page in the Crew Centre.
Starting a Flight
Connecting to smartCARS 3 to your simulator
The latest version of smartCARS 3 will automatically start tracking a flight once you have loaded into the simulator at the correct departure airport for a dispatched flight

The  icon indicates that this flight is being tracked and considered a live flight. As such, the Delete button is no longer shown.
In smartCARS 3, the icon is slightly different, but you will still see your live flight in the Dispatch screen with this green icon next to it.
You'll also notice that a flight that is in progress cannot be deleted. Instead, there is an icon to take you to the Flight Tracking screen.

Troubleshooting connection issues
If the simulator is not running, smartCARS 3 may not be able to connect. Double-check that you are at an airport from which you have a dispatched flight departing. For support, you can try our Discord, or escalate to TFDi Design support.
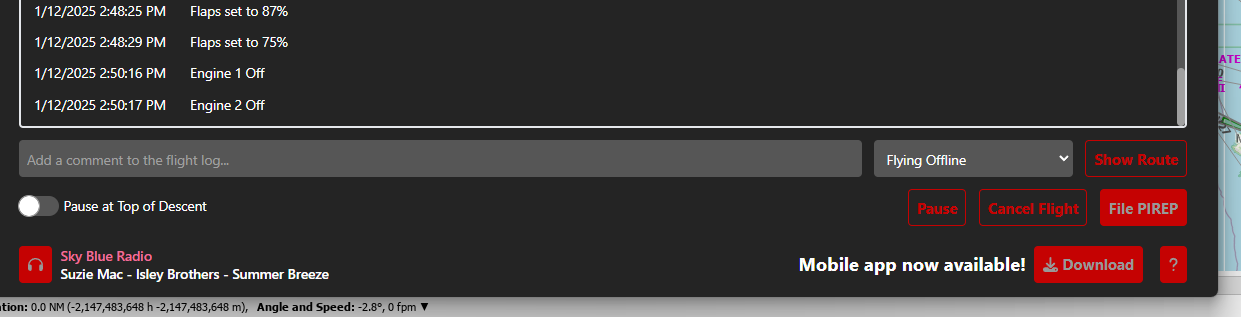
During the Flight
Monitoring your flight
During your flight, it is a good idea to keep an eye on the flight tracking in smartCARS 3 to avoid any nasty surprises upon arrival.
The screen below will show you all the details of how smartCARS 3 is tracking your flight.

You can also consult the Live Flights section of our website to ensure your flight is being recognized there.
If you are flying a Tour Leg or Event, the Type column in the table should properly identify the Tour Leg or Event. If it does not, your flight was not dispatched properly. Consult our Tours and Events guides for more details.
Pause at ToD
SmartCARS 3 features a Pause at TOD toggle button which will pause the simulator when smartCARS 3 think it's time for you to descend. This may not be 100% accurate, but it is a decent way to ensure you don't forget to return to the cockpit when it's time to do things.
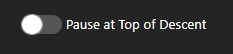
Simply toggle on the option. When the sim reaches TOD, smartCARS 3 will pause the sim. You'll then be able to unpause from smartCARS 3.
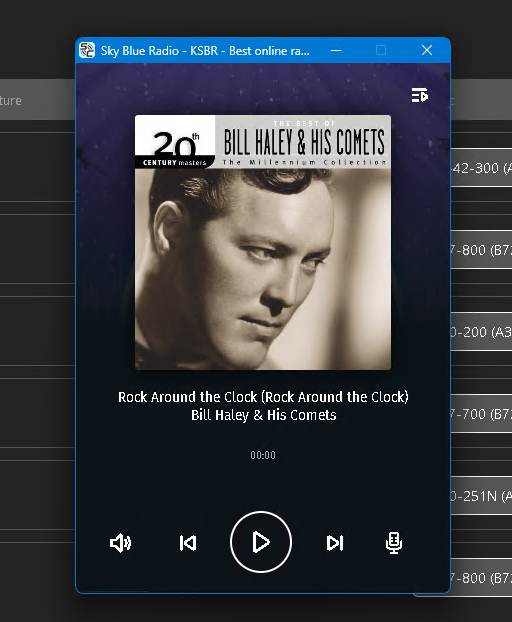
Sky Blue Radio
smartCARS 3 has Sky Blue Radio integrated into the application. You can access it via the button at the bottom of all screens.

Minimizing the App
By default, SmartCARS 3 will minimize itself to the system tray when closing the application.
You can change that by visiting the Settings screen and toggling off the "Minimize the tray" option.
Ending a Flight
Saving and submitting the pirep
By default, smartCARS 3 will automatically submit your pirep to our VA Management System once the deboarding stage is entered. This is typically triggered by shutting off the engines.
If you want to file your pirep manually, you can disable the automatic submission in the Settings.

You will then have to manually click the File Pirep button to submit your pirep.
Once your pirep has been submitted, you will see it in the Logbook.
If your flight met all required parameters for a successful flight, the pirep will be instantly accepted. Any Tour Leg progress, Event awards, or other awards based on flight time, distance, etc, will immediately be credited.
If there are some potential issues detected with your flight, your pirep will be held in pending status until reviewed by a Canada Air Virtual staff member.
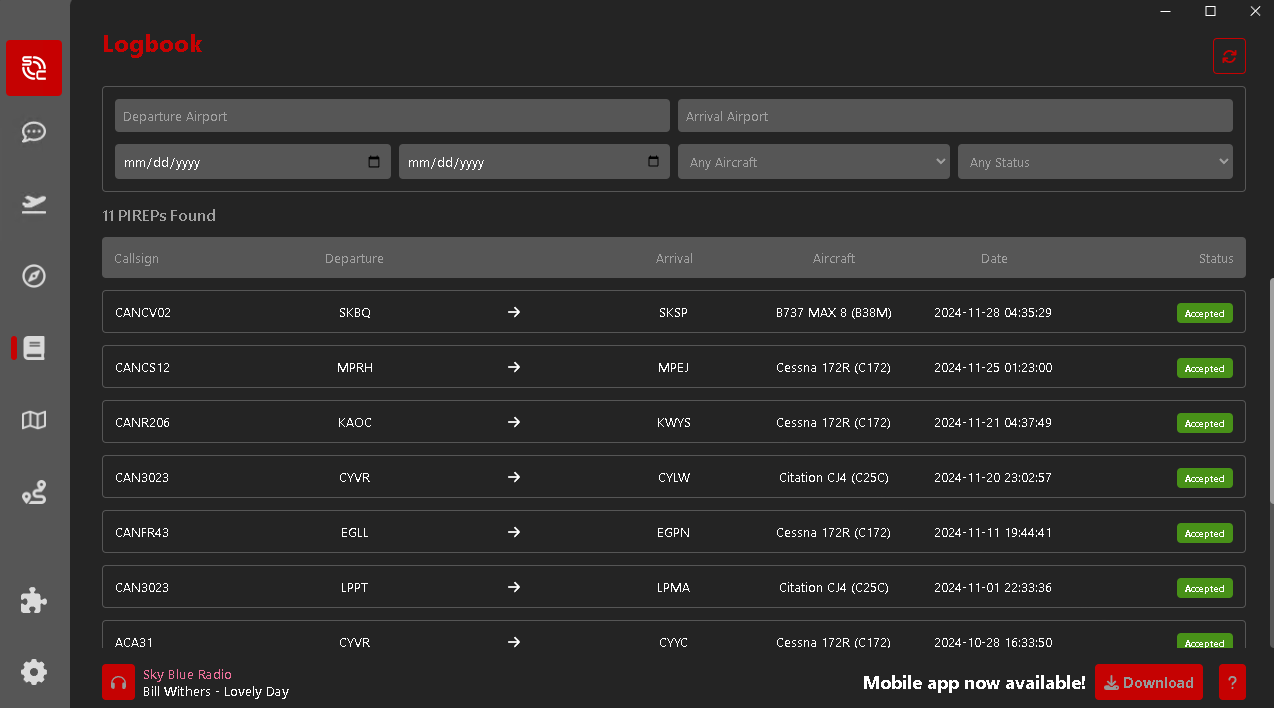
Reviewing Your Flights
Accessing flight logs
You can access your logbook on our website, but it is also available inside smartCARS 3.

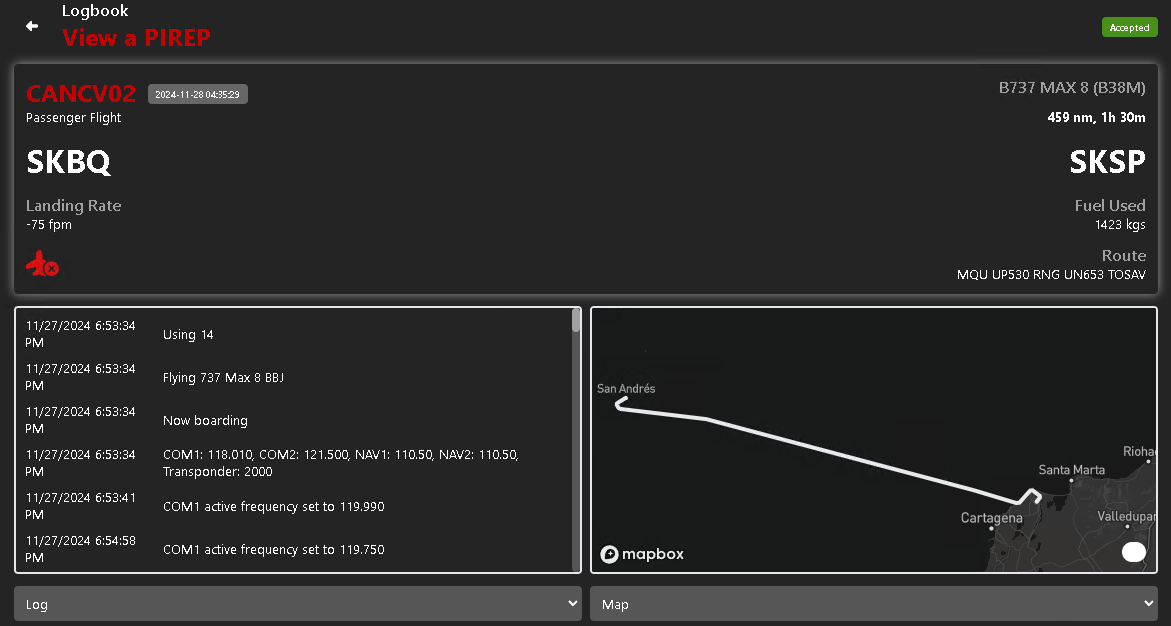
Click on any flight to view further details.
Integration with Third-Party Tools
Setting up SimBrief
smartCARS 3 supports SimBrief integration via the use of an optional plugin. Follow these steps to install and configure it.
Install SimBrief Plugin
Go to the Plugins icon in the left side bar.
Click the Browse Plugins button in the top right.
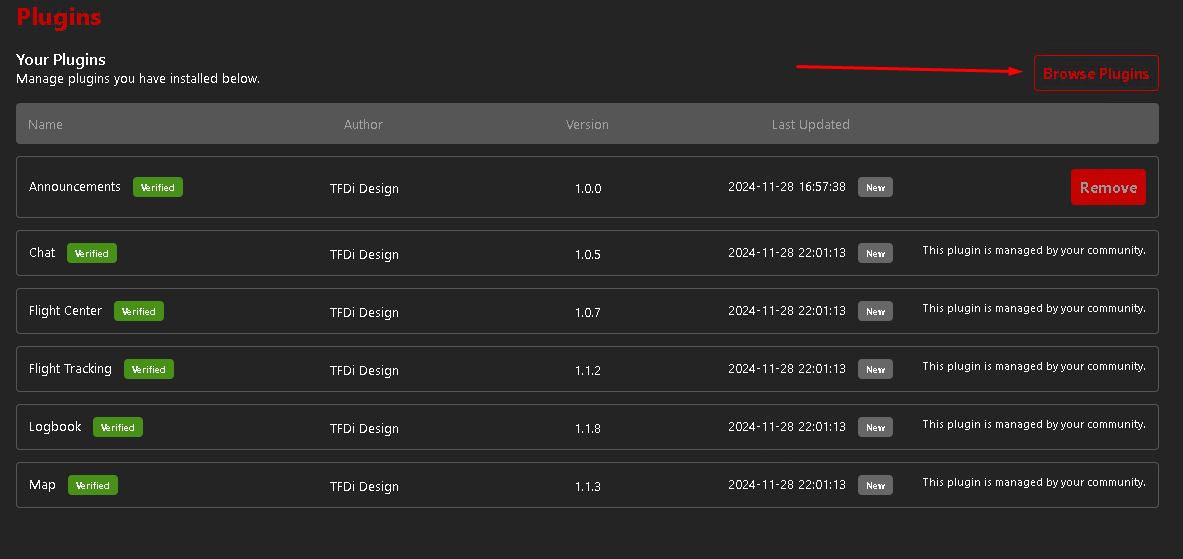
Find the SimBrief plugin and click the Add button.
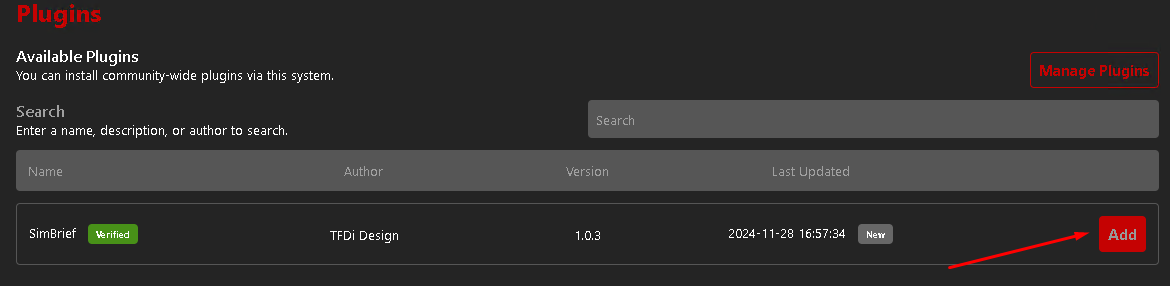
Restart smartCARS 3 for the plugin to activate
Configure the SimBrief plugin
Go to the Settings and fill out the new SimBrief settings.
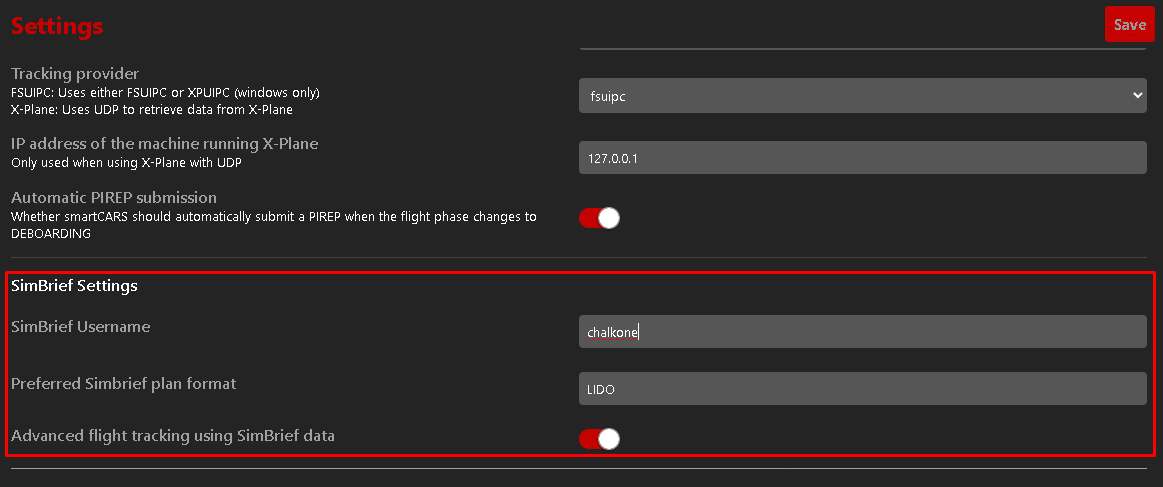
You can find your SimBrief Username in the SimBrief Account Settings in the "Your Navigraph Account" section under "Alias (Username)". 